LeftyBassist.com

The online home for southpaw bassists.
It is currently November 1st, 2024, 2:32 pm


Post new topic Reply to topic  [ 33 posts ]  Go to page 1, 2  Next
Author Message
 Post subject: new build - M-Series 4-string lefty
PostPosted: November 20th, 2010, 2:22 pm 
Offline
User avatar

Joined: March 10th, 2008, 7:00 pm
Posts: 1184
Location: Seattle, WA USA
Documenting the first M-Series lefty build from genesis to completion …

Specs:
• Spanish Cedar body core with figured Maple top, Honeyburst finish (similar to the first lefty Axiom)
• AAA Birdseye Maple neck, zero-fret, 12”R fretboard, 34” scale, 21 frets, bone nut
• Nordstrand Big Singles pickup set
• Nordstrand 2-band preamp configured Vol (pull bypass) + Blend + Passive tone + Active Bass/Treble stack
• Hipshot Type A bridge, alum core, .75” string spacing
• Hipshot Ultralights with Y-keys
• Chrome hardware
• Dunlop strap locks

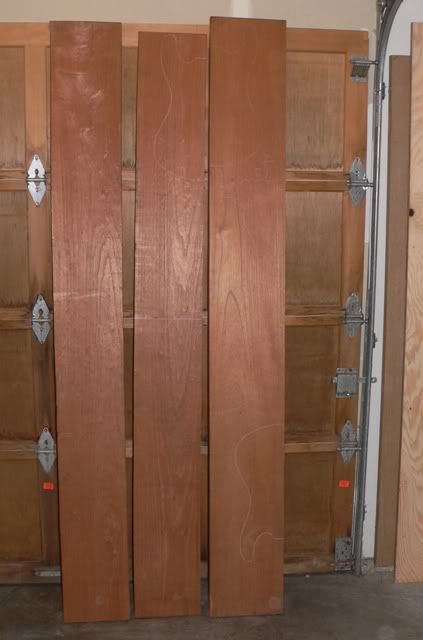
The rough kiln-dried Spanish Cedar 8/4 lumber was selected at a lumber yard about 4 hours drive from my shop during a vacation this past August. It’s been acclimating in my shop for several months now
Image

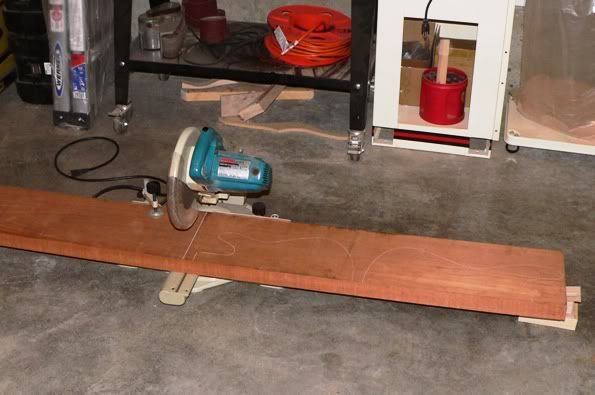
After selecting the board for this build, I first shorten it to a workable length with a miter saw. Notice that I have shims at the ends so that the board will not drop (or worse – that the miter saw will suddenly tilt while the saw is still running!) once it’s been cut thru. I leave these shims just shy of touching the ends so as not to bind the saw blade while cutting
Image

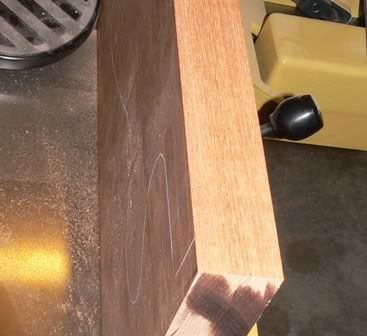
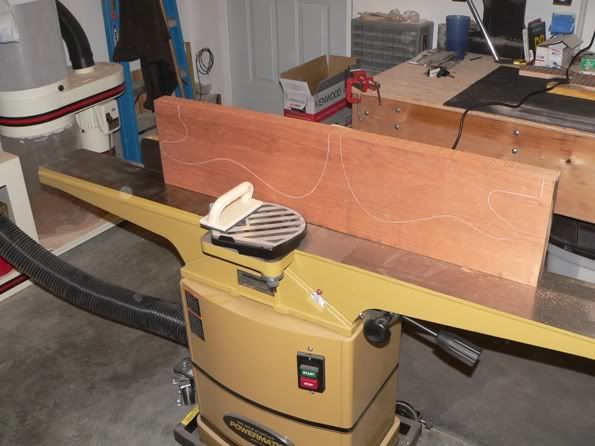
Once I have a workable size I square the edges with a jointer. The intended outcome is that I’ll have edges that are exactly perpendicular to the face and also perfectly level and smooth along the glue edge.
Image

Before and after images of the glue edge
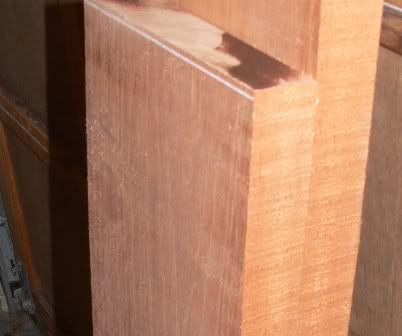
Image Image

The jointer I’m using has a helical cutting edge, so the freshly jointed edge is significantly smoother than what a standard 2 or 3-blade cutter head will produce. This said, the edge fresh off of a jointer still needs to be hand detailed to remove all of the minuscule ‘cups’ the cutting blades leave behind. The cups from a helical head are pretty much non-existent, but they are there if you use high quality measuring tools to find them. The cups from a standard cutter head can be felt if you carefully run you finger down the edge, and will require more clean-up attention. One other key benefit of a helical cutter head is that is more forgiving of highly figured woods, causing less tear out on flame, birdseye, and burl figures

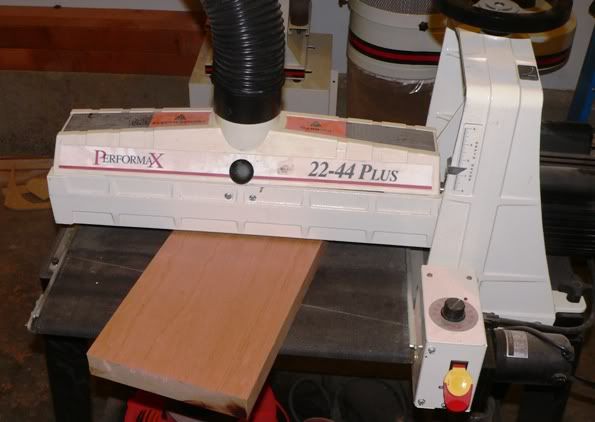
Once I have the glue edge detailed, it’s time to thickness sand the boards to within 1/32” of the final body core thickness. I will first cut the body core section into two pieces so I eliminate the potential for snipe. I’ll then alternate running each piece thru for a given thickness reduction, setting the board at a slight angle to help the sandpaper cut the grain easier. Spanish Cedar can get fuzzy if you run the piece straight on along the grain, and this will bog down the sanding drum. For this phase of the thicknessing I use 80-grit paper on the drum
Image

It’s now time for a dry-fit to ensure the glue joint is tight and that the grain is aligned for a pleasing pattern. If I don’t have a perfect fit prior to adding clamping pressure I’ll detail the joint further until it simply disappears when lightly pressed against the mating piece.
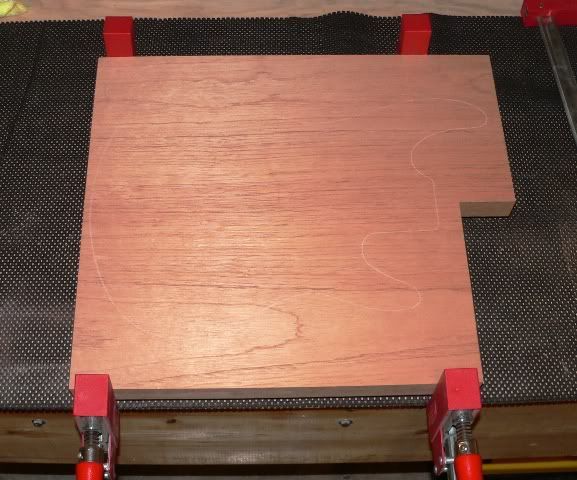
Image

Once I’m happy with the joint it’s time to apply an even coating of glue along the mating surfaces and clamp them together with even pressure from both sides of the body core. I like to use clamps from alternating sides so to help eliminate any clamping stresses that could arise from clamping just one side. I also want to see glue squeeze-out evenly along both sides of the entire joint
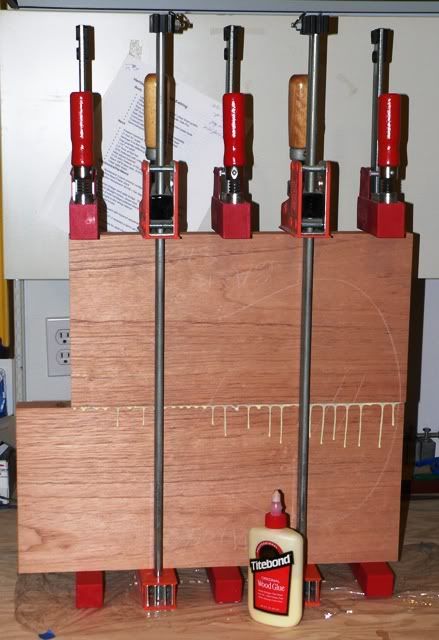
Image

The body core blank will now sit to cure for 24+ hours depending on the wood species.

More to come in the next installment. Until then …

All the best,

R

_________________
Moderator: Blueprinting and Bondo
Pickups: Honey Badger Pickups - Like Honey Badger Pickups on Facebook!
Basses: Regenerate Guitar Works - Like Regenerate Guitar Works on Facebook!


Top
 Profile  
Reply with quote  
 Post subject: Re: new build - M-Series 4-string lefty
PostPosted: November 20th, 2010, 5:03 pm 
Offline
User avatar

Joined: November 26th, 2008, 6:14 am
Posts: 3624
Location: Oahu, Hawaii
Rodent, thanks for this thread, I like these informative steps on how a bass is put together, starting with the wood, how the grain can determine the sanding process, etc. Nice tight fit on that glue joint! The picture makes it look like one solid piece. Looking forward to more progress pics and descriptions....

_________________
R&B Stretch Bass, Walter Woods 1000w Green-Light Stereo Amp, AccuGroove El Whappo and TR112, assorted axes, amps, cabs...
http://www.myspace.com/thestrangershawaii


Last edited by fivebass52 on November 20th, 2010, 9:05 pm, edited 1 time in total.

Top
 Profile  
Reply with quote  
 Post subject: Re: new build - M-Series 4-string lefty
PostPosted: November 20th, 2010, 6:00 pm 
Offline
User avatar

Joined: March 14th, 2008, 10:57 am
Posts: 2866
+1
The amount of detail you go into makes for facinating reading. And it adds vast amounts to my sorely lacking knowledge of bass building.

And it's good to see you finally have some time to devote to building instruments again.


Top
 Profile  
Reply with quote  
 Post subject: Re: new build - M-Series 4-string lefty
PostPosted: November 21st, 2010, 6:53 pm 
Offline
User avatar

Joined: March 10th, 2008, 7:00 pm
Posts: 1184
Location: Seattle, WA USA
time for another installment on this body build ...

after removing the core from the clamps, I used a card scraper to remove the glue runs prior to thickness sanding the core to its final target thickness. similarly, I also gave the bookmatched Maple top it's final thickness sanding. I use a dial caliper to measure the thickness so I can exactly meet my target on both the top and main core, and to ensure that I have even thickness on the entire piece

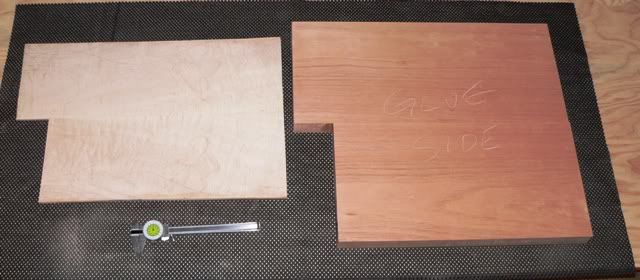
here's the top and body core ready for gluing (sorry, I forgot to snap images of how this bookmatched top was assembled, but the process is very similar to what I did for the body core)

Image

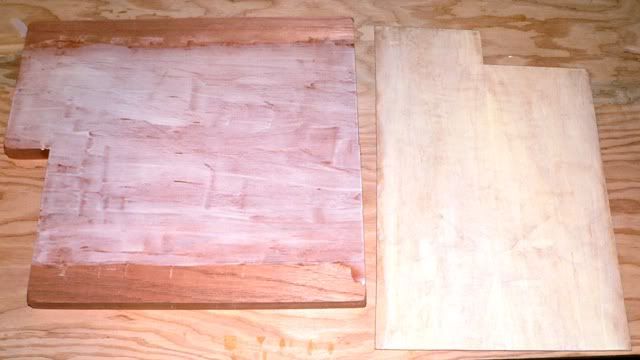
it's important to use ample glue (but not too much!) and cover the entire surface of both pieces being joined. I use Titebond Original for most of my glue-ups, and spread it with a roller to ensure even coverage across the entire surface

Image

once the glue has been applied to both faces I secure the location of the top laminate utilizing multiple pieces of tape. I mark the centerlines on each piece so it's easier to see if some glue is applied to it.

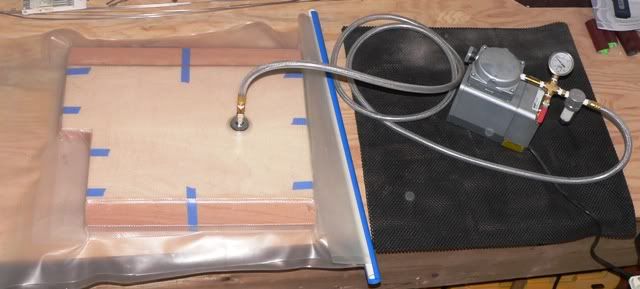
when everything is taped into position I roll out the vacuum bag, slide in a piece of breather material, carefully insert the body sandwich, add another piece of breather material to the top side, and clamp the end shut. the rest is as simple as connecting the vacuum hose and stepping on the on/off switch to start the pump

Image

the sandwich will remain in this vacuum bag for roughly 24 hours so that the glue can completely cure.

until next time ...

all the best,

R
_________________
Moderator: Blueprinting and Bondo
Pickups: Honey Badger Pickups - Like Honey Badger Pickups on Facebook!
Basses: Regenerate Guitar Works - Like Regenerate Guitar Works on Facebook!


Top
 Profile  
Reply with quote  
 Post subject: Re: new build - M-Series 4-string lefty
PostPosted: November 22nd, 2010, 10:18 am 
Offline
User avatar

Joined: March 10th, 2008, 7:00 pm
Posts: 1184
Location: Seattle, WA USA
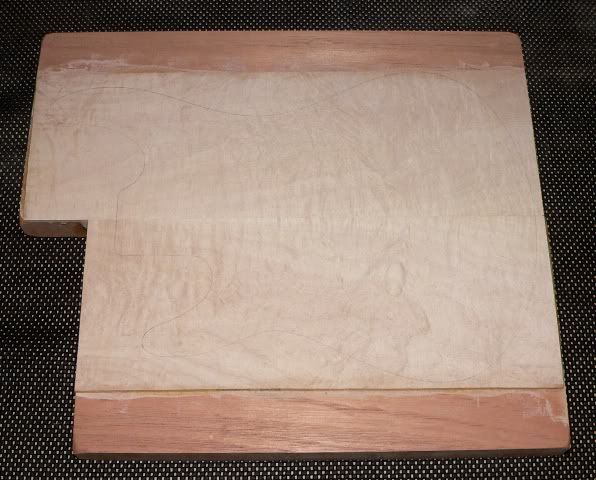
and here's the result - a body core with figured top where all of the glue lines are perfectly aligned

Image

the next step in this process is to cut the neck pocket with a friend's CNC. sorry, per his request I'm unable to provide an image that would reveal his system and/or hold-down techniques. the next image will be of the body blank (with newly added neck pocket cavity) at the next step in construction


and just in case you're curious why I've migrated to utilizing vacuum clamping vs the more traditional use of an unending number of clamps ...

it's a common practice I've seen in use at many of the 'big guys', and also used at a number of the smaller custom builders as well.

vacuum clamping has a couple key advantages over the traditional method of endless clamps. here's the main ones that drove my decision to move to this method:

- ease of set-up. I simply need to apply glue to both sides of the laminates to be mated, flip them into position and carefully align the seams, tape the pieces together so that they do not shift, and then insert into the bag and suck the atmosphere out to apply the clamping pressure

- evenness of clamping pressure. since it's the earth's atmosphere providing the clamping pressure, I'm assured of even pressure all the way around resulting in superior glue lines all around. since moving to this method I have yet to experience a 'wiggle' in a glue line where one clamp was a little tighter than the one next to it. in cases where I'm laminating thin layers (less than 1/4" iin thickness) I use a caul to assist in providing firm pressure across the mid section

- no slippage while clamping. I am able to carefully align the seams so that they're dead-on then merely tape them into place. gone are the days of everything slipping all over the place while tightening all those clapms. gone also are the nicked router bits that accidentally caught one of my alignment pins buried in the sandwich

- and finally ... LESS STRESS during glue-up! my blood pressure no longer rises while gluing a complex body sandwich, and I no longer feel the need to quarrantine the shop just before starting a glue-up. unless I'm a careless idiot when inserting the core into the vacuum bag, everything stays exactly where I put it ... including my blood pressure :) I am actually beginning to enjoy the glue-up process once again

I can say that utilizing the vacuum bagging approach has revolutionized the build process more than anything I've done in the past 2-3 years. it has allowed me to significantly increase my quality while simultanoeusly decreasing my stress levels. once I begin sucking out the atmosphere from the baggie, I can quickly move on to another project without the need for an extended breather and time to decompress before doing anything else

I'm also in process of making several cauls that match my headstock transition radius. with these, I'll also be able to start offering a matching headstock veneer on my M-Series builds.


let me also toss out this caution: vacuum bagging isn't going to solve issues associated to poor build practices. you need perfectly prepared glue faces if you want clean glue lines - this is true for whatever method you use to apply clamping pressure. surfaces that look like they where made planer with a cheese grater will result in ugly lines. so will gaps. if you've become accustomed to utilizing extra clamping force to eliminate waviness in your mating pieces, this is not a clamping method for you

there's no shortcut to good, solid prep work


until then ...

all the best,

R
_________________
Moderator: Blueprinting and Bondo
Pickups: Honey Badger Pickups - Like Honey Badger Pickups on Facebook!
Basses: Regenerate Guitar Works - Like Regenerate Guitar Works on Facebook!


Top
 Profile  
Reply with quote  
 Post subject: Re: new build - M-Series 4-string lefty
PostPosted: November 22nd, 2010, 10:41 am 
Offline
User avatar

Joined: March 14th, 2008, 10:57 am
Posts: 2866
Rodent wrote:
and just in case you're curious why I've migrated to utilizing vacuum clamping vs the more traditional use of an unending number of clamps ...
... LESS STRESS during glue-up! my blood pressure no longer rises while gluing a complex body sandwich, and I no longer feel the need to quarrantine the shop just before starting a glue-up. unless I'm a careless idiot when inserting the core into the vacuum bag, everything stays exactly where I put it ... including my blood pressure :) I am actually beginning to enjoy the glue-up process once again


Bag 'em, Dano! :lol:


Top
 Profile  
Reply with quote  
 Post subject: Re: new build - M-Series 4-string lefty
PostPosted: November 22nd, 2010, 12:07 pm 
Offline

Joined: March 14th, 2008, 2:28 pm
Posts: 965
That is very cool Rod, I have no personal experience with vac pressing techniques though I have read about them. Is the equipment expensive? how many uses will you get from each bag?

_________________
"Nothing is what is seems, but everything is exactly what it is." B. Banzai


Top
 Profile  
Reply with quote  
 Post subject: Re: new build - M-Series 4-string lefty
PostPosted: November 22nd, 2010, 1:11 pm 
Offline
User avatar

Joined: March 10th, 2008, 7:00 pm
Posts: 1184
Location: Seattle, WA USA
I opted for the heavy duty bag in a size that also allows me to fit a neck blank inside so I can attach a fretboard. the bag with shipping was a little over $100. all totaled I'm around $400 into the set-up when I factor in shipping for the various parts.

unless I leave the bag out in the sun, expose it to some kind of reactionary chemical that would eat a hold or cause it to become brittle, or tear it beyond repair ... the bag should be good for several years to come. I'm just about to pass the 10 use milestone and I see no wear on it whatsoever.

I'll be adding another branch to the system sometime next year, as well as several home made vacuum storage chambers (PVC pipe with caps and connections) to support the use of multiple bags. the idea is to be able to work multiple glue-ups at a time and eliminate my current limitation of five body cores per week

all the best,

R
_________________
Moderator: Blueprinting and Bondo
Pickups: Honey Badger Pickups - Like Honey Badger Pickups on Facebook!
Basses: Regenerate Guitar Works - Like Regenerate Guitar Works on Facebook!


Top
 Profile  
Reply with quote  
 Post subject: Re: new build - M-Series 4-string lefty
PostPosted: November 22nd, 2010, 8:06 pm 
Offline

Joined: March 14th, 2008, 2:28 pm
Posts: 965
Very cool.
So you just add a valve in each branch so that you can operate each one seperately? Does the bag stay hooked up and under vacuume the whole time or can you disconnect the bag after the atmosphere is removed? I'd love to see a pic of the system once you get it all assembled.

_________________
"Nothing is what is seems, but everything is exactly what it is." B. Banzai


Top
 Profile  
Reply with quote  
 Post subject: Re: new build - M-Series 4-string lefty
PostPosted: November 23rd, 2010, 6:17 am 
Offline
User avatar

Joined: November 26th, 2008, 6:14 am
Posts: 3624
Location: Oahu, Hawaii
You mention inserting a breather material into the vacuum bag, but I don't see it in the picture. What's it made of, and what is the purpose? Thanks.

_________________
R&B Stretch Bass, Walter Woods 1000w Green-Light Stereo Amp, AccuGroove El Whappo and TR112, assorted axes, amps, cabs...
http://www.myspace.com/thestrangershawaii


Top
 Profile  
Reply with quote  
 Post subject: Re: new build - M-Series 4-string lefty
PostPosted: November 23rd, 2010, 10:24 am 
Offline
User avatar

Joined: March 10th, 2008, 7:00 pm
Posts: 1184
Location: Seattle, WA USA
Quote:
So you just add a valve in each branch so that you can operate each one seperately? Does the bag stay hooked up and under vacuume the whole time or can you disconnect the bag after the atmosphere is removed?


yes, I'll add a couple T's (OK, more probably I'll simply add a manifold at the same time I add the vacuum canisters) I keep the hose connected the entire time just in case there was to be an itsy bitsy leak somewhere ... I definitely wouldn't want to lose vacuum in the middle of the glue curing

Image

Image

Quote:
You mention inserting a breather material into the vacuum bag, but I don't see it in the picture. What's it made of, and what is the purpose?


you can actually see it in the photo if you know what to look for ... the breather material is a course plastic mesh that is stiff enough to resist being crushed under the vacuum. its purpose is to ensure that all atmosphere is evenly evacuated and that an air bubble doesn't get trapped somewhere in the middle when the bag edges are being sucked down. the material also gives a place for the glue to exhaust out to when the vacuum pulls out the excess. the process also appears to such the glue into the wood pores as the atmosphere is pulled from the bag

here's an image of the same mesh I use

Image

here's a link on the mesh in case you want to read further: http://www.joewoodworker.com/veneering/ ... r-mesh.htm

all the best,

R
_________________
Moderator: Blueprinting and Bondo
Pickups: Honey Badger Pickups - Like Honey Badger Pickups on Facebook!
Basses: Regenerate Guitar Works - Like Regenerate Guitar Works on Facebook!


Top
 Profile  
Reply with quote  
 Post subject: Re: new build - M-Series 4-string lefty
PostPosted: December 21st, 2010, 5:29 pm 
Offline
User avatar

Joined: March 10th, 2008, 7:00 pm
Posts: 1184
Location: Seattle, WA USA
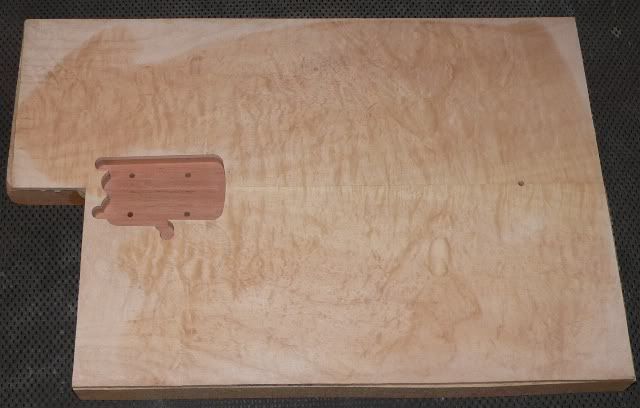
back from the CNC shop just moments ago ...

Image

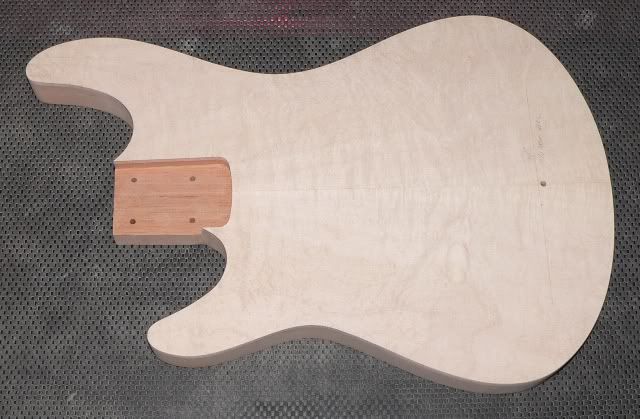
not only is the neck pocket cut with exacting precision when utilizing a CNC, but I can also compensate the bottom pocket face to include the slight angle that is usually accounted for by adding a neck shim. it's far better to account for this when machining the neck pocket, because I can ensure that the neck is mounted flush into the pocket and that the energy transfer is not disrupted. the physical amount equates to around 1/64" difference front to back ... small enough that it's difficult to consistently cut to exacting tolerances utilizing just a hand-held router and templates

now it's time to get busy on the body outline, pickup & control cavities, and forearm & gut-cut contours


for several days now I've been leaning towards this getting a Honeyburst, but Cherryburst and a Vintage 2-tone burst running close behind

all the best,

R

_________________
Moderator: Blueprinting and Bondo
Pickups: Honey Badger Pickups - Like Honey Badger Pickups on Facebook!
Basses: Regenerate Guitar Works - Like Regenerate Guitar Works on Facebook!


Top
 Profile  
Reply with quote  
 Post subject: Re: new build - M-Series 4-string lefty
PostPosted: December 22nd, 2010, 5:31 pm 
Offline
User avatar

Joined: March 10th, 2008, 7:00 pm
Posts: 1184
Location: Seattle, WA USA
more progress today ...

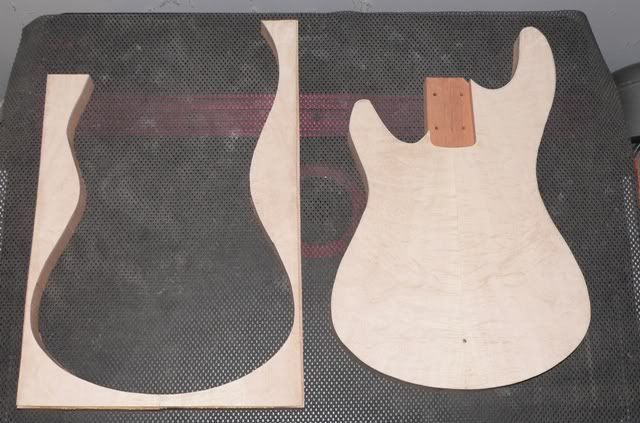
body contour has been rough cut with a bandsaw, keeping within about .06" excess to be sanded in the next step

Image

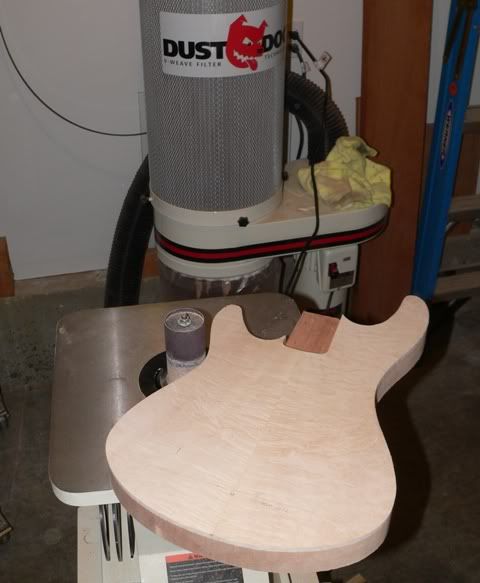
then it's over to the oscillating spindle sander for a game of chase the line :lol: the idead is to take light passes over a long length to work your way to the center of the body contour outline. a millisecond too long in one place or too hard of a push and you get small cupped spots

Image

these cupped spots are only a couple .001" deeper than the surrounding wood, but you can feel them when you quickly run your fingers along the edge. rubbing the edge with chalk and then hitting the high spots with some sandpaper hepls to reveal where these cups are. I use a semi-flexible sanding pad to hand detail the body edge to eliminate any cupping ... I also will pass my fingers along very quickly to identify any unevenness or flat spots in the outer contour

Image

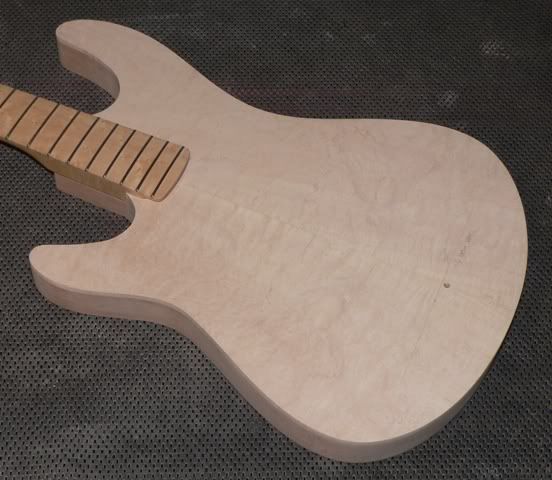
once I have the outer contour fully detailed, the body can be moved onwards to the next steps. here's a peek at how this body is starting to look like a bass and no longer like just a bunch of wood

Image

all the best,

R

_________________
Moderator: Blueprinting and Bondo
Pickups: Honey Badger Pickups - Like Honey Badger Pickups on Facebook!
Basses: Regenerate Guitar Works - Like Regenerate Guitar Works on Facebook!


Top
 Profile  
Reply with quote  
 Post subject: Re: new build - M-Series 4-string lefty
PostPosted: December 23rd, 2010, 2:18 pm 
Offline
User avatar

Joined: March 10th, 2008, 7:00 pm
Posts: 1184
Location: Seattle, WA USA
I had time to get the g-string side of the neck pocket edge detailed so that it's just a smidge behind the finished edge of the neck. this will allow the edge to be flush with the neck when the finish has been applied

Image

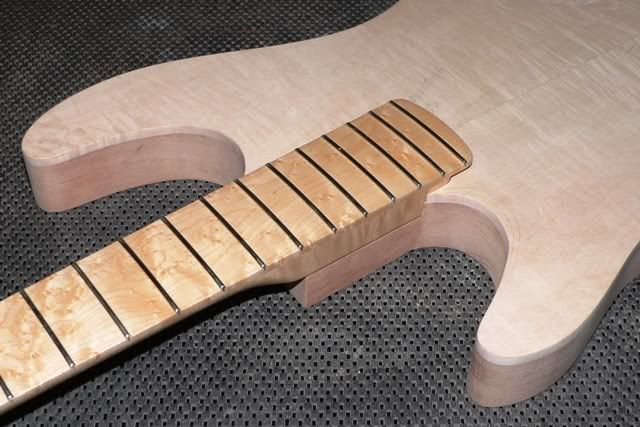
here's an image with the neck set into place for visual reference of how this body design is going to come out as a lefty. as you can see - super roomy and easy access to that all important 21st fret. upper fret access will be enhanced even further when the contoured heel has been shaped from its current blocky from

Image

all the best,

R

_________________
Moderator: Blueprinting and Bondo
Pickups: Honey Badger Pickups - Like Honey Badger Pickups on Facebook!
Basses: Regenerate Guitar Works - Like Regenerate Guitar Works on Facebook!


Top
 Profile  
Reply with quote  
 Post subject: Re: new build - M-Series 4-string lefty
PostPosted: January 22nd, 2011, 1:42 pm 
Offline
User avatar

Joined: March 10th, 2008, 7:00 pm
Posts: 1184
Location: Seattle, WA USA
it's been quite a while since I last posted an update to this thread - lots has been happening on this build, but I haven't had time to write the step-by-step details of what I've been doing. I'll get to that in a week or two, until then here's an image of how this is looking out in the shop

Image

I need to carve the tummy and forearm contours, add the control cavity cover recess, contour the heel and add the neck mounting ferrule recesses, install the trussrod adjustment slot, add the side jack hole, and drill all the wire tunnels before giving this a detail sanding.

I'm still thinking a Honeyburst finish is the finish this build is crying for, but visions of a transparent blue stain have been drifting thur my head the past couple of days

all the best,

R

_________________
Moderator: Blueprinting and Bondo
Pickups: Honey Badger Pickups - Like Honey Badger Pickups on Facebook!
Basses: Regenerate Guitar Works - Like Regenerate Guitar Works on Facebook!


Top
 Profile  
Reply with quote  
 Post subject: Re: new build - M-Series 4-string lefty
PostPosted: January 24th, 2011, 11:47 am 
Offline

Joined: March 14th, 2008, 2:28 pm
Posts: 965
I agree, a trans blue with a black wash before would really pop that grain and look beautiful with the maple neck!

_________________
"Nothing is what is seems, but everything is exactly what it is." B. Banzai


Top
 Profile  
Reply with quote  
 Post subject: Re: new build - M-Series 4-string lefty
PostPosted: July 14th, 2011, 9:44 am 
Offline
User avatar

Joined: March 10th, 2008, 7:00 pm
Posts: 1184
Location: Seattle, WA USA
I've been stalling on this build for a while now ... this is partly because of my paid backlog priorities and day-job craziness, but it's also partly due to me simply not loving the figuring on that Maple top. the more I stare at it, the more I'm convinced that it doesn't meet my standards for what a figured top should possess. so ...

I'm thinking of giving this a solid color finish, and am currently leaning towards vintage Shell Pink in Nitro. the Birdseye/Birdseye neck would go great with it, and I just might create a custom pickguard to help divide the top real estate up a little. if I did the pickguard, I'm thinking a white Pearloid/B/W material would go nicely with the Shell Pink

I've also been considering Seafoam Green, Dauphine Blue, and Vintage White as well. IMO a Tort guard would go nicely with these colors ... but each of these colors crys out for a Rosewood fretboard IMO, and so I head back to the Shell Pink


have I lost it living in solitary isolation out in the shop? :lol:

all the best,

R

_________________
Moderator: Blueprinting and Bondo
Pickups: Honey Badger Pickups - Like Honey Badger Pickups on Facebook!
Basses: Regenerate Guitar Works - Like Regenerate Guitar Works on Facebook!


Top
 Profile  
Reply with quote  
 Post subject: Re: new build - M-Series 4-string lefty
PostPosted: July 15th, 2011, 2:08 pm 
Offline
User avatar

Joined: March 14th, 2008, 10:57 am
Posts: 2866
Rodent wrote:
...simply not loving the figuring on that Maple top. the more I stare at it, the more I'm convinced that it doesn't meet my standards for what a figured top should possess. so ...


Hey Rod,
before you do something rash, can you post some naptha drenched pics of the top so we can get an idea of what's tugging on your shorts?


Top
 Profile  
Reply with quote  
 Post subject: Re: new build - M-Series 4-string lefty
PostPosted: July 15th, 2011, 4:11 pm 
Offline
User avatar

Joined: March 10th, 2008, 7:00 pm
Posts: 1184
Location: Seattle, WA USA
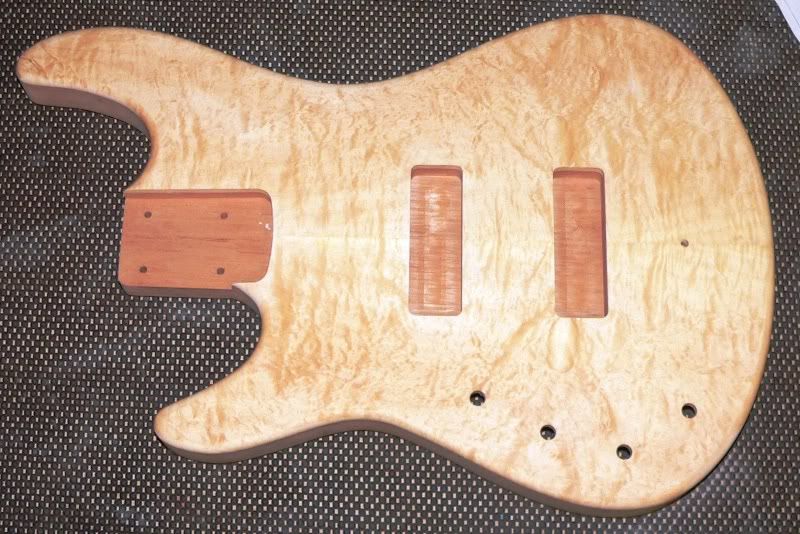
sure - here ya go

Image

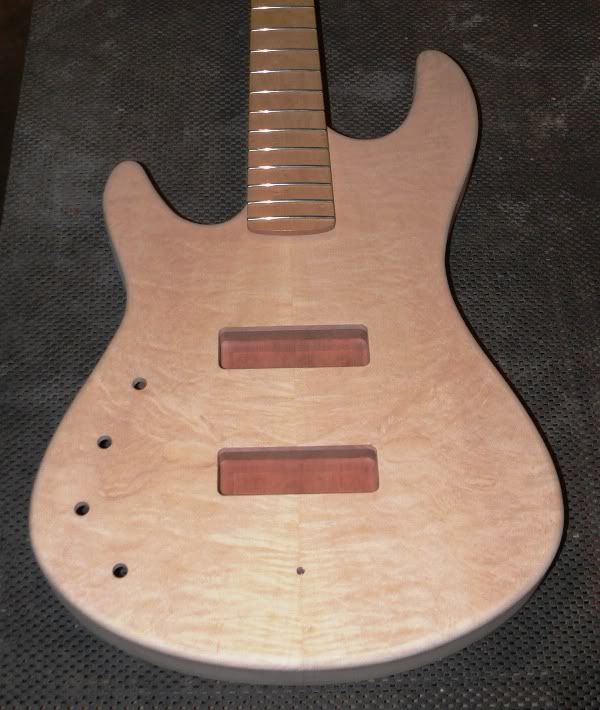
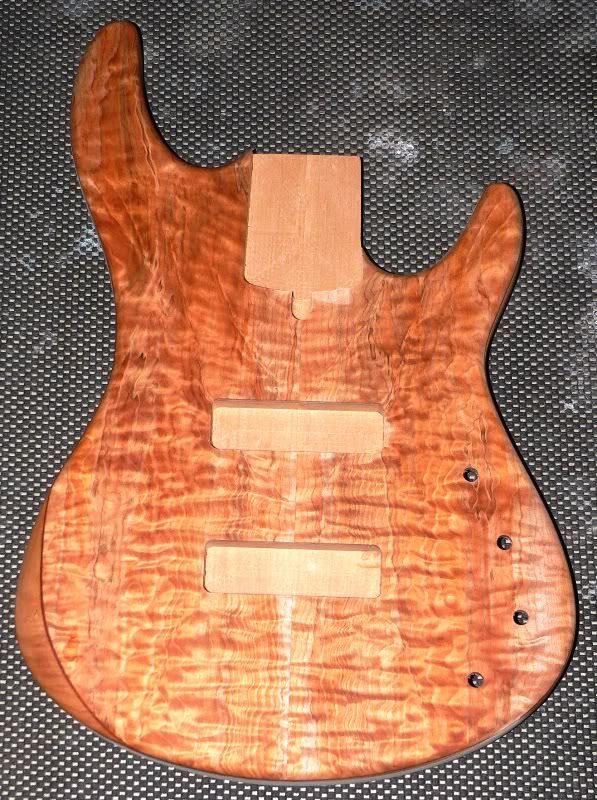
maybe I'm just a lot pickier about the tops I use now vs. a top I would have considered fine just a year or two ago. sure there's lots of figuring in this top, but I don't see a regular pattern motif in the figure ... it's just not wowing me like this prototype (below) did when that body was at a similar completion point

Image

unless it sells prior, I got time to make a new Maple/Rosewood neck for it and still have this ready for a local business show I'll be hosting a booth at in November. this means I could decide to go with a gloss black body, Maple/Rosewood neck, and Tort guard and have it ready well in advance of the show


good news is that I'm really liking the new pickguard and control plate I finished designing for the painted body M-Series units. all the controls will be on a 4-knob polished stainless plate that is best described as my take on how I've been influenced by Leo F and Mike Pedulla's eye for design. I hope to have the initial prototype plate available before the end of Aug if it's possible to do so. I need to rework my pencil drawings to CAD so this can be laser cut - if all works as it looks on paper, I think I really am on to something

all the best,

R

_________________
Moderator: Blueprinting and Bondo
Pickups: Honey Badger Pickups - Like Honey Badger Pickups on Facebook!
Basses: Regenerate Guitar Works - Like Regenerate Guitar Works on Facebook!


Top
 Profile  
Reply with quote  
 Post subject: Re: new build - M-Series 4-string lefty
PostPosted: July 20th, 2011, 10:24 am 
Offline
User avatar

Joined: March 10th, 2008, 7:00 pm
Posts: 1184
Location: Seattle, WA USA
Sea Foam green is really tugging at me this morning ... I claim no responsibility for what may occur out in the shop this weekend :P

all the best,

R

_________________
Moderator: Blueprinting and Bondo
Pickups: Honey Badger Pickups - Like Honey Badger Pickups on Facebook!
Basses: Regenerate Guitar Works - Like Regenerate Guitar Works on Facebook!


Top
 Profile  
Reply with quote  
Display posts from previous:  Sort by  
Post new topic Reply to topic  [ 33 posts ]  Go to page 1, 2  Next


Who is online

Users browsing this forum: No registered users and 119 guests


You cannot post new topics in this forum
You cannot reply to topics in this forum
You cannot edit your posts in this forum
You cannot delete your posts in this forum
You cannot post attachments in this forum

Search for:
Jump to:  
Powered by phpBB © 2000, 2002, 2005, 2007 phpBB Group  
Design By Poker Bandits